Showing posts with label Do it Yourself. Show all posts

Wednesday, October 15, 2014

Halloween Costumes | October 15th 2014


I love reality TV. It's a bad habit but it's SO entertaining I mean how can you not get a kick out of it?!
I don't know why I didn't think of this costume. This is play off of Toddlers and Tiaras which I love by the way. This costume is super easy to diy. All you really need for this is a nice dress, sash, a stuffed animal, and a bad attitude.


How could I keep Elsa out of the line up. I actually have never seen Frozen, but with everyone talking about it and singing the songs I basically know the movie. Even without seeing the movie who wouldn't want to be Elsa? Am I right, or am I right?


I was literally a witch for Halloween like 4 years in a row. My costume never looked this cute by the way.  Witch costumes are pretty common but you can make it your own and as long as you wear a witch hat everyone will be able to tell who you are!


Not only is Wednesday hump day, but it's also a great Halloween costume to. She is personally my favorite character from the Adams Family. Most women own a little black dress, shoes, and tights so all you really need is long hair or a wig. I would say you could nix the wig and just go all natural but we don't want people not knowing who you are.


Who doesn't love the minions from Despicable Me. They are so darn cute I want one to carry around in my pocket. Also this costume is pretty recognizable so no questions of what you are. Don't you just hate that?!


I present to you the fashion blogger costume. I invented this myself because fashion blogging is basically a career in itself. For this you can basically wear anything you want but I am liking this plaid!

XOXO
SimplyWorn

Friday, June 20, 2014

Floral Arrangement DIY | June 20th 2014


Hey  guys! So today I have a diy I was super excited about doing for the longest time. There are probably a lot of variations of this on the web, but I adapted this idea from LagunaBeachLove10 on YouTube and she has awesome diys. This diy fake water vase was super easy and the actual labor takes like 30 minutes. This is a great alternative to real flowers because they have to be replaced so frequently, even though they are soo pretty. I will definitely be doing this again and I actually think I have enough solution to one more arrangement. #score 

What You Need:
+ Silk flowers of your choice (I choose these because they had thick stems that look realistic)-Michael's (Use Retail Me Not for coupons on this and water)
+ Simulated Water-Joann's
+ Mason Jar/ Vase-Michael's


What You Need Based off Simulated Water (Follow directions on specific brand)
+ Gloves
+ Disposable container
+ Disposable Stirring Device


+ Take flowers off of stem so you can arrange them how you want and so it looks more realistic!


+ Stir the solutions together for the allotted time on box, and then pour mixture carefully into desired vase/jar.


+ Arrange flowers how you want, you have enough time, so don't fret. You then have to let it sit overnight.
Then Wala you have a new floral arrangement that will last a lifetime!

XOXO
SimplyWorn


Friday, May 30, 2014

DIY: Jewelry Plate | May 30th 2014

Hey guys! So today I have a little diy for you! I have needing to clean off my dresser for the longest time, and I finally did it! To go along with my de-cluttered dresser I thought it would be so cool to make a jewelry plate as well. This was super easy and the only thing I had to buy was the plate, which is from Dollar Tree! Maybe you will find some time to do this project as well! 


What You Need:
Plate-Dollar Tree
Dinosaur- Already Owned (Can find at local craft store)
Super Glue- Already Owned (Can find at local hardware store)
Gold Spray Paint- Already Owned (Can find at local Walmart)
Tape- Already Owned (Can find at art store)


It's pretty much self-explanatory, but I thought I would give the briefest explanation of what I did.

1. I taped off all the parts I wanted to remain white. I did it free had so it's not perfect at all, but I like it like that.
2. Next, I sprayed the plate as well as the dinosaur.
3. Then I let it dry outside for about an hour.
5. Next, I glued the dinosaur to the plate,and it dried almost instantly.
4. Then I used it! Bam! That easy!


Not the best photography and it looks way better in person, but hopefully you can see my vision, and I hope you will try it too!

XOXO
SimplyWorn

Friday, April 11, 2014

Easter Egg Diy

Hey guys! So Easter is literally right around the bay so I thought I would show you a fun Easter egg diy. You can use it for an Easter egg party and they can still open with this diy so you can hide them too! If you want to make some of your own keep scrolling!


What You Will Need:
1. 2 Plastic Eggs
2. Gold Spray Paint (Mine is from Walmart)
3. Hot Glue Gun OR Super glue
4. Ribbon ( Mine is from Hobby Lobby)
5. Sequins (Mine are from Hobby Lobby)
6. Tape (Any kind will work mine is from an art store)
7. Newspaper


Step 1: I separated my eggs and just taped them to newspaper so it wouldn't blow away while I was spraying it.


Step 2: I sprayed them and let them dry for an hour.


Step 3: I decorated them! You can do what ever you want and make it your own. I basically used sequins for one and wrapped around ribbon for the other. I preferred using a glue gun, but be careful when gluing the sequins because they are small.


This diy is super easy and took me about 2 hours with a break in between. Hopefully this gave you some inspiration for Easter and I hope your Easter is hoppin!

XOXO
SimplyWorn

Wednesday, July 24, 2013

DIY Wall Art


Hello Guys! So today I have a cool DIY for you and I am so excited about it! I actually found this idea from Ohhh Mhhh when trying to find an idea to do something different for the wall in my room. It's super easy and I think it looks way better  than what I had before just because it's cleaner and neater. If you would like to know how I achieved this beaute keep scrolling:)


This is what my wall looked like before. I really liked it but it just seemed to cluttered and the pictures were falling off-as you can see.


This is after and I think it looks clean and makes my room look bigger! 


So the materials you need:
+ Hangers I got these at Walmart for about a dollar
+ Push Pins (I already had these but you can find them mostly anywhere)
+ Spray paint ( I choose gold and I used this for the hangers and push pins- $3.77-Walmart)


It's pretty basic but you just spray paint it! It says wait 24 hours but after I sprayed both sides of all 10 they were all dry.
Tips:
+ Spray kind of far away; I did it to close and used almost all the paint
+ This is probably a given but wear clothes you don't mind getting dirty. I learned that the hard way by getting spray paint on one of my favorite jeans.
+ If you don't want your hands getting all "golden" wear gloves. Although I didn't wear any and the spray paint came off my hands super easy.


A great way to display your magazines and to have wall art!
XOXO
SimplyWorn
P.S.- I mark my magazines with stickies so when I go back I don't have to go through the whole thing! That's what the colorful things hanging off the pages are:)


Monday, July 15, 2013

DIY Floral Desk

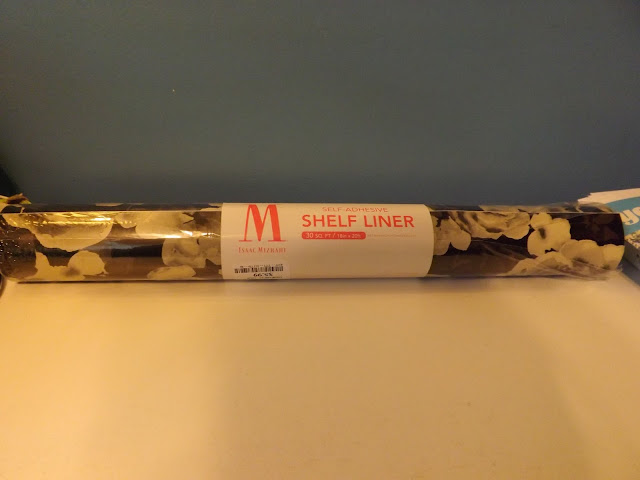
Hey guys! Today I have a DIY for ya. I have been wanting to do something to my desk and I was gonna paint it but then I found this amazing shelf liner so I decided on it. My desk is actually a make shift desk made out of a board and set on two shelves. It's super easy and definitely spices up any room!

Materials:
* Plywood/ Board (you can get scraps from Lowe's, Home Depot, etc.)
* Shelf Liner (I got mine from Marshall's for like $6.00 dollars, but I know the stores above sell it too!)
*Space (I learnt that the hard way trying to do it in my room)


Step 1: Roll out the shelf liner so you can measure it with the length of the board.


 Step 2: Once placed on the board crease the sides so you know where to cut.


Step 3: I turned it over so I could cut on the lines...I am a horrible cutter...as you can see.


Step 4: The you simply peel the backing off and stick it! I peeled as I went but you don't have to do it that way.

Step 5: Put it in place and TA-DA you have a classy, cool, new desk!


The shelf liner tells you how to apply it but I am a visual learner, so I thought I would show you how I did it :)
Hope you found something new to try!
XOXO
SimplyWorn
Related Posts Plugin for WordPress, Blogger...